Megan Nichols shares her insights on how to prepare yourself for any seasonal get-togethers with this braided updo tutorial.
Read the full transcript here:
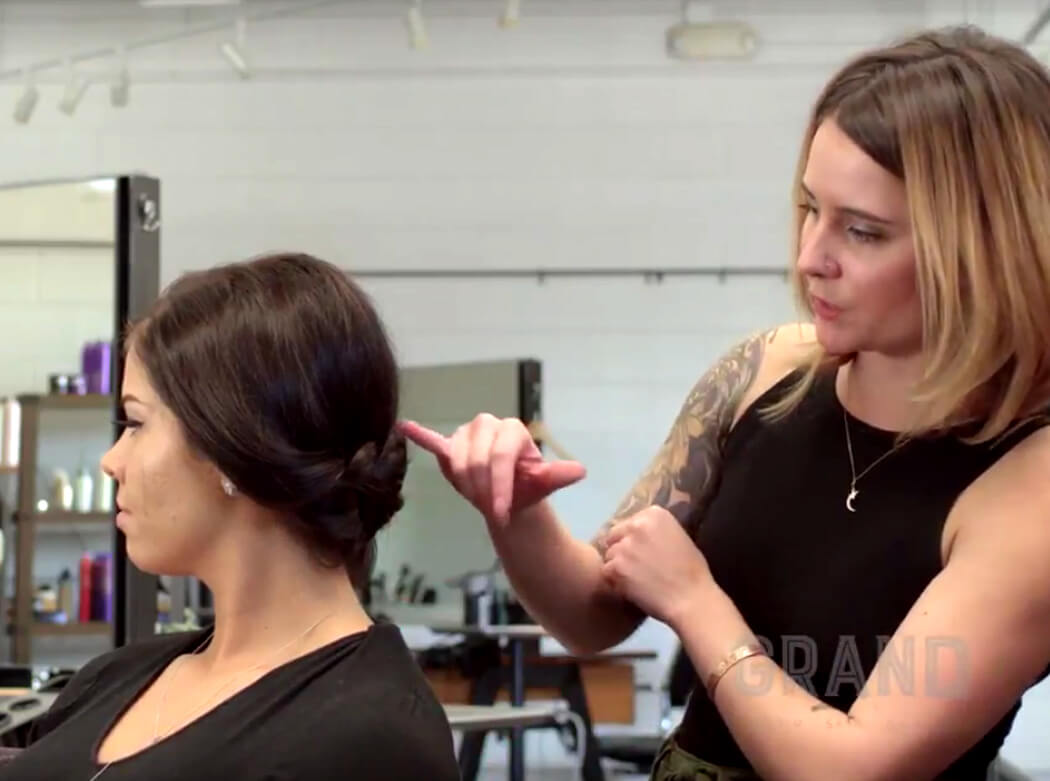
Hi, I’m Megan with Grand Salon. And today, I’m gonna be showing you how to do a simple but elegant braided updo.
My lovely model, Stephanie, here has her hair prepped with styling lotion and a heat protectant. And our first step to this updo is going to be back combing. So I’m really gonna focus about right here on the head just the back of the crown. You’re gonna want to split the hair in two sections. The section’s probably about an inch, maybe a tiny bit bigger, and what I’m gonna do is hold the hair straight up, place my brush here and almost do, like, a parenthesis down, so like a C shape. So really easy, fast way to back comb without sitting and teasing and teasing and teasing.
So next, we are going to smooth out this top section. I like to use just the corner of my brush here for the smoothing. Maybe it’s a little bit more up in here. Next, we are going to divide the hair into three sections. I’m gonna insert my finger here and, kind of, work towards the back of the middle of the neck, and that would be our first section and then our second. You do want the sections to be as equal in density as possible.
I’m gonna smooth back her hair away from her face, and all we’re going to do is a very simple three-stranded braid. And if you are a more advanced hair stylist, you can certainly do different types of braids, the five-stranded braid, the fishtail braid, but today, we’re just doing a basic three-stranded braid. And nothing about this updo has to be perfect. It is a very bohemian, loose, loopy kind of updo, so don’t feel like everything needs to be absolutely perfect.
Beautiful. All right. So we just have our three braids now. I’m going to take this middle braid and just clip it out of the way for the time being. And then I’m going to start with our braid on the left side of Stephanie’s head and cross it over, the back of her head, and use two bobby pins to anchor it. And now we’re taking the right braid and crossing it over to the left side the back of Stephanie’s head and once again, two bobby pins for the anchoring. And finally, we’re gonna take this last braid and tuck it over to the right side, insert the hairpin up, and hook it down is most successful way to use hairpins.
So now, what I’m gonna do is kinda start playing with the braids, start stretching them out, finding the loops, and pinning. So I will insert the pin up and then hook it down against the scalp. So as you can tell, you’re kinda seeing the braid and we’re just stretching out each little loop. It’s a great way for making that look like you curled your hair and pinned it and you didn’t. Now with the pins, as you can tell, I’m working on these bottom loops, so I’m going down into the loop, and then hooking up against the scalp.
Now, as you can see, so far, they’re just blending right in with the hair. It’s really nice, really soft. So this side is looking a little bit looser, so what we’re gonna do here is tighten that up. In this, I’m gonna use a bobby pin. And right now, I’m just, kind of, finding these little tiny flyaways which are very common right on the back of your neck, and just trying to tuck those up into the updo just so we don’t have a bunch of loose hairs hanging down. You can totally tighten this up in the front if you want more of a sleeker look, or you can leave it so it’s a little bit softer, a little more tousled-looking.
It’s okay to use as many hairpins as you feel you need. All righty, I think that is looking very beautiful. So now I like to go in and just do some final touches because it is a looser updo, I’m using in a rattail comb to just kinda go in, add a little bit of separation. It’s fine to even add a little bit of fuzziness to this. And now I’m doing is inserting and lifting the hair up and that’s just gonna create a little more volume, a little more separation in the updo. And then finally, if you so choose, you can finish it off with some hairspray just for hold, get rid of any of the flyaways.
So here is our final product. This is a really nice updo to do if you’re going to a holiday party or if you don’t have a lot of time. It takes a quick 15 minutes is all and it looks great. It looks beautiful. Looks like you walked into a salon and paid $50 for an updo.
Did you enjoy this video? Then come watch our hair styling tutorials. Afterwards, come check us out on Facebook to be the first to see our newest videos!